Related Tables
After you've built a linked field to pull data from a source table to a target table, you can utilize that relationship to show all the linked records in a related table in the source table. You could consider this the inverse of linked fields: putting a related table in a source record shows all external records in the selected outside table that reference your source record.
Related tables are embedded tables that simply reflect the links stored in the target table's linked field; they take up no space in the source table, because they function as a saved search showing data stored elsewhere, but that also means you can't use related tables in automation, reporting, or table views. This is sometimes referred to as the passive link, in contrast to the active link represented by the linked field.
Example
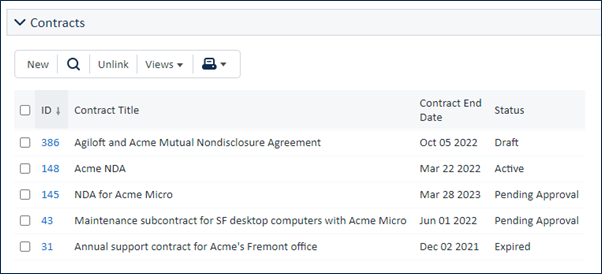
For example, there's a linked field in the Contract table that pulls the company's name. From the other side of the link, in the Company table, a related table shows all the contracts linked to the company.
As with other embedded tables, you'll want to create an appropriate table view and action bar to use in a related table. However, related tables are not the same as the embedded tables created by a Link to Selected Fields with multiple values enabled. Although both are displayed as embedded tables, related tables do not store the link data, and they can't be used to support other functions in the table. For more information about the distinctions between these data types, see Creating Many to Many Relationships.
To create a related table, there must first be other tables referencing your source table data; at least one field of your source table must be defined in another table as a Linked Field.
Creating a Related Table
To create a new related table:
- Click Setup [Table], or click the Setup gear in the top-right corner, click Tables, select the table, and click Edit.
- Go to the Fields tab.
- Hover over New and select related table. This opens the wizard on the General tab.
General Tab
On this tab, select the table and linked field relationship that the related table shows data from.
- Select the source table for your related table. This is the table that holds the linked field you want to reference in the table you're working in. For example, if you're editing the People table to pull in all the Opportunities assigned to a salesperson, you would select the Opportunities table. You can select tables from the current KB or another Agiloft KB.
- If you select a different source KB, provide the login credentials for a member of the admin group. Then, click Get Tables and select the table you want to use as the source.
- In the Table/Relationship field, find the linked field relationship in the list and select it.
- Enter a label for the related table. This appears above the embedded table when it appears in a record form.
- In the Admin Notes field, enter a brief description of the field and its function, as well as any other information that other administrators might need to know.
Permissions Tab
This tab is similar to the permission settings in other wizards. It offers a way to copy the permissions from another field in the current table, and you can manually select groups that can or cannot perform certain functions.
The second option is specific to related tables, and it's important to consider: Additional filters. This option allows you to filter the linked records that appear in the embedded table. For example, if the related table is likely to find hundreds of records going back a long time, you might apply a filter to show tickets from within the last month.
Any additional filter you apply is applied in addition to any other relevant permission restrictions. For example, if users only have access to their own records in the source table being referenced, users only see their own records in the related table as well. If you apply an additional filter to show only records less than a month old, users only see their own records that are also less than a month old.
Display Tab
Similar to the display options for other embedded tables, the main choices for a related table are the view and action bar to use. You can also elect to make the action bar items active only when the record is being edited, or whenever the record is viewed or edited.
- Select a source table view to use in the related table. In most embedded tables, including related tables, you'll want a dedicated view with fewer columns so that users only see relevant information.
- If you want to automatically refresh the contents of the table while a user works in a record, set the Table View Refresh Rate to a value in minutes and seconds.
- Select a source table action bar to use in the related table. It's best to use the action bar designed for related tables rather than the default action bar from the source table, so users don't see irrelevant options like Print. For more information, see Action Bars.
- Choose whether to allow users to use the action bar only when editing the main record, or also when viewing the record.
- If necessary, here you can set the system to check the linked records to see if they're locked for editing, and to display an icon for any records that are currently locked. This is resource-intensive and not usually necessary, so in most cases you should leave this set to No.
- Complete the remaining standard field display options: input instructions, text alignment, and label and instruction placement.