Using the Sample ESA
A working sample External System Adapter (ESA) is directly downloadable from within your Agiloft KB. It also functions as an example for users who would like to develop their own ESA. Users may modify and reuse the sample ESA code for their own use as desired.
While built for illustration purposes, the sample ESA is a fully functional ESA that syncs with a virtual external system which is either co-located or running on an external server.
Note that the Sample Remote Proxy code simulates running on a remote server that contains the remote external system adapter and database. This is why this documentation refers to the external system and its data tables as 'virtual' – there is no actual remote external system database and no actual remote external system data tables. Those 'tables' and 'data' are pre-loaded in the Sample ESA bundle to make this process easier to set up and understand.
To demonstrate how the ESA works, the virtual external system includes two tables: 'Virtual Contacts', with the fields ID, Full Name, and Email; and 'Virtual Cases', with the fields ID and Summary. The
AgiloftEmployees table will be mapped to Virtual Contacts and the
Agiloft Support Case table will be mapped to Virtual Cases. Actual data is stored in a file directory, using a Java properties format - plain for Employees/Contacts, XML for Cases. Employees/Contacts files use the naming convention contact_123, where 123 is the record’s value in the ID field. Similarly, Case files use the naming convention case_123.
The Sample ESA uses a single parameter, Work Directory (workDir), to hold the directory path for storing data files. The value of the Work Directory parameter is input on the ESA Settings screen which appears once a connection gets established, as per Step 11 below. Note that this directory will be a subdirectory of the initial sync Home directory defined in Step 1 of the ESA builds.
Note that the synchronization process is nearly identical for both Windows and Unix systems, with only the directory paths and therefore command line text being unique to each system. However, in the interest of clarity this manual will show the Windows installation process.
Building a Sample ESA
Follow the guided steps to build a sample ESA.
Create a work directory:
- Create a work directory named 'syncHome' on your local directory, for instance C:\syncHome. This will be the directory where data and files are stored.
- Note: the actual name of the directory is not important, but the rest of this guide will refer to the work directory as syncHome.
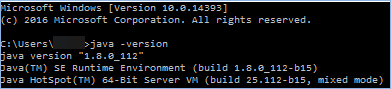
Install the Java Development Kit (JDK):
- Download and install the most current JDK: http://www.oracle.com/technetwork/java/javase/downloads/jdk8-downloads-2133151.html.
- Note the name of the JDK installer; for instance, jdk-8u112-windows-x64.exe. This will be used to update the PATH variable.
- Update the PATH variable to include syncHome and the JDK. See: https://www.java.com/en/download/help/path.xml.

- Verify that the JDK was correctly installed:
- Open the Command Prompt window by clicking the Start menu, typing 'cmd' and pressing Enter.
- Type: java -version.
Configure the sync subsystem:
- In your KB, go to Setup > Sync > New > External Sync to open the Sync Configuration wizard.
- Add the following details:
- Configuration Name - add a descriptive name such as MySync
- external system Type - select Third-party Adapter from the drop-down
- Select the Third-party ESA (Command Line) radio button
- Select 1 for Command Line Parameters
- Status - Enabled
- Directions - Two-way sync
- Conflicts - external system should take precedence
- Remoting - select the external system Adapter runs remotely radio button. This will enable the Download ESA Remote Proxy button.
- The external system ID Prefix is system-generated and will be used by sync to connect to the ESA Remote Proxy.
- At this point, leave the window open while you complete the next sections of steps to set up the ESA development package. Only when the package is ready should you click Next and proceed.
Download the Sample ESA development package and remote proxy:
- In the external system Type section of the Sync Configuration wizard, there is a link named "To download the ESA developer bundle, click here." Click the link to download the sync-example.zip file.
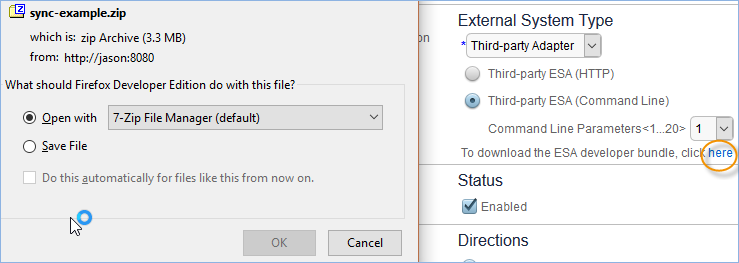
- Extract the zip file contents to your syncHome directory.
- In the Remoting section of the Sync Configuration wizard, click the Download ESA Remote Proxy button. This downloads the esa.jar file. The jar file is configured specifically for your system and contains your Agiloft server name and external system ID.
- Save the file to the syncHome directory.
The syncHome directory should now contain the following files and folders, which can be verified using the Command Window. Type 'dir' to view the contents of the directory, or 'dir/p' to show one page on the screen at a time:
| File/Directory Name | Description |
|---|---|
| com (directory) | Contains example sources and a Java support library. The sample ESA code is in the com.supportwizard.sync.sampleesa.SampleEsa class, located in the SampleEsa.java file in the com/supportwizard/sync/sampleesa directory. |
| commons-logging-1.1.1.jar, FortifyAnnotations.jar, log4j.jar, commons-digester-1.8.jar | Libraries needed for the example. |
| make.bat, make.sh | Build scripts for Windows and Linux, respectively. |
| run.bat, run.sh | Run scripts for Windows and Linux, respectively. Run.bat is invoked from Start_ESA.bat in Windows. Run.sh is invoked from Start_ESA.sh in Linux. |
| META-INF (directory) | META-INF in the example. |
| log4j.xml | Logging configuration in syncHome/out. |
| in.txt, out.txt | Input and output XML examples. |
| esa.log | Handles the remote proxy logging. |
| cl-esa.log | Handles
Agiloft sync subsystem logging. |
| sync.external systemd | XML messages scheme in syncHome/out. |
| ESA_Developer_Guide.docx | This document. |
| Start_ESA.bat | This file needs to be in either the C:\Agiloft folder or its location in the user's PATH environment variable. It is invoked by the sync subsystem to make the connection with the ESA Remote Proxy in Windows. |
| Start_ESA.sh | This file needs to be in either the /usr/local/Agiloft folder or its location in the user's PATH environment variable. It is invoked by the sync subsystem to make the connection with the ESA Remote Proxy in Linux. |
Run the make.bat script:
- In the Command Prompt window, in the syncHome directory, type
make.batand click Enter. This is a script that executes several commands that are necessary for the sample ESA to function correctly. - Once the script has run, keep the command prompt window open and return to your browser.
Verify the Start_ESA.bat script:
- The sync subsystem will call the
Start_ESA.batscript to executerun.batto launch the Agiloft ESA. First, make sure thatStart_ESA.batmatches your configuration. - Note that the
Start_ESA.batfile should be in the syncHome directory, and the location added to the user's PATH environment variable. Start_ESA.batexpects that in Step 3 above you specified 1 for the Command Line Parameters number in the external system Type section. If you chose a number other than 1, you must editStart_ESA.batand change the PARAM value to match. If your ESA home directory is not C:\syncHome you must also modify the path of the run.bat file:set /A PARAM = 1 - or = number of CL Parameters specified during configuration IF %1==%PARAM% cmd /c C:\syncHome\run.bat - or C:\your Sync directory\run.bat
Varying the number of command line parameters will allow you to run multiple remote ESAs.
Check the ESA configuration and launch the Agiloft sync subsystem:
- At this point you should have walked through all previous steps and added all of the settings, with the Sync Configuration wizard open in the browser. In the Sync Configuration wizard, click Next. This launches the Agiloft sync subsystem and begin polling, where it will be waiting for a connection from the external system Remote Proxy ESA.
- While the system is trying to connect, in the Command Window enter
java -jar esa.jarand press Enter. This command tells the ESA Remote Proxy to connect to the Agiloft sync subsystem, obtain the command to launch the sample ESA, and run it. You should see a success message similar to the following:
- When you return to the browser window, the ESA Settings screen will have appeared, where you can set the directory to store the synchronization data files.
Set the data storage directory:
- In the
syncHomedirectory, create a sub-directory namedsampledata. This will be where data files are stored following synchronization. - In the Work Directory field of the ESA Settings tab, enter
sampledata. - Click Next to open the Mapping screen.
Configure sync table mappings:
- The Mapping screen contains a list of the tables in the KB, which can be mapped to structures in the external system. Here you can establish the relationships between Agiloft KB tables on the left, and external system ESA tables in the drop-down list on the right. Note that the external system tables are 'virtual' in this example, since there is no real external system or tables.
- Begin by selecting Virtual Contacts from the Employee drop-down to map the Employees table to the Virtual Contacts external system table, then click Map to open the Field Mapping screen.
- In the Field Mapping screen, you can define the mappings between fields in your
Agiloft table, and in the selected external system table. In this example, create the following mappings between
Agiloft and the external system respectively:
- Email - Email. Select "Identifying" for this row.
- Full Name - Full Name. Select "Identifying" for this row.
- Employee ID - ID.
- By default, the Use strict match for identification checkbox is selected.
- Click Finish.
- Next, select the Support Case table and map it to Virtual Cases, then click Map.
- In the Field Mapping screen, create the following mappings:
- Case ID - ID, with Update in External selected
- Summary - Summary, with Update in Agiloft, Update in External, and Identifying all selected
- Click Finish, then click Next to navigate to the Relation Mapping screen.
Configure the Relation Mappings and Running option:
- The Relation Mapping screen enables you to map external relations to linked field sets in Agiloft. In this case, the Customer relation will be mapped to the Employee(Cell Phone, User Company, Customer Phone...) linked field set. This will reflect the relationship between Support Case-Virtual Cases and Employee-Virtual Contacts.
- Click Next to navigate to the Running screen.
- Select Manual to specify the synchronization process initiation mode.
- Click Finish.
- The sample Remote Proxy ESA sync subsystem is configured.
Running Synchronization
This section describes how to perform synchronization between your sample ESA and your Agiloft KB.
- Open the Support Cases table in the KB.
- Go to Actions > Sync > Run MySync.
A dialog screen shows the progress of the synchronization. When the sync has completed, it displays a success message with some links to view the log file and the records which were updated.
If you need to re-sync using a clean synchronization, don't just delete files and re-run synchronization. Doing so may result in propagation of deleted files, if this is permitted in the sync configuration. To reset a full match history, edit your sync record and click the Resets Records Peering button at the bottom of the Sync Configuration wizard.
- Clicking the affected records link opens the Synchronization Results screen where you can view all of the records which were created, updated or deleted between Agiloft and the external system.
Sample ESA Code Description
The full Sample ESA source code is included in the SampleEsa.java file in the syncHome\supportwizard\sync\sampleesa directory. See: com.supportwizard.sync.sampleesa.SampleEsa. This section will walk through the code in this document, and is Java-implementation specific. However, it is recommended that you understand how the Sample ESA works even if you plan to use another language, since the ESA logic will be the same.
The Javadoc comments for the classes and methods of the ESA are in the ExternalSystemAdapter.java document at syncHome\com\supportwizard\sync\interfaces\esa.
package com.supportwizard.sync.sampleesa;

import com.supportwizard.sync.interfaces.esa.*;

...

public class SampleEsa extends ExternalSystemAdapterBase {

...
If you plan to use the Java support libraries, your ESA class should implement the ExternalSystemAdapter interface. This single interface contains all of the ESA operations. Some of them are only called under certain circumstances. To have the full implementation of the auxiliary methods, extend the ExternalSystemAdapter base class.
public class SampleEsa extends ExternalSystemAdapterBase {

    /**
     * Sample ESA uses log4j logger. You may use any other logger, such as java.util.logging.Logger,
     * but DO NOT USE System.out for logging.
     *
     * Command-line ESA uses System.in and System.out to exchange XML messages with sync core.
     * All non-XML output is omitted, so you will never see it.
     */
    private Logger log = Logger.getLogger(SampleEsa.class);
The Sample ESA works as a command line (CL) ESA. This means that its standard input and output can be used for exchanging XML messages.
Do not print anything on the standard output. Use the logging facilities instead. By default, all the Sample ESA logging goes into the cl-esa.log file, and the Remote Proxy logging goes into the esa.log file, both in the home of the syncHome directory.
ESA Parameters
The Sample ESA uses a single ESA parameter: a working directory location. In this case the name is workDir.
// File location parameter
private static final String WORK_DIR = "workDir";
The following method returns the parameter metadata described for the sync core:
public
List<EsaParameterMeta>getParametersMeta(Locale
locale) throws EsaException, RemoteException
This code inside the startSync() method uses the parameter:
// Read work dir parameter value
List<EsaParameter> paramValues =
syncCoreApi.getParameter(externalSystemID,
WORK_DIR);
assert paramValues.size() == 1; // There must be a
single string (parameter type is TEXT, SINGLE).
String workDirPath = paramValues.get(0).getStrValue();254
assert workDirPath != null;
The List<ESAParameter> paramValues.... WORK_DIR); line queries the sync core callback interface for the stored parameter value, passing the parameter name workDir as a key.
Sync State
The startSync() method sets the ESA into a 'synchronization is running' state.
public String startSync(String externalSystemID) throws EsaException, RemoteException {
Most of the ESA methods are only called in this state. The ESA may connect to the external system in startSync(), for example. The getParametersMeta method is called before entering sync state. This is needed to ensure that the ESA parameters are properly configured before entering the sync state.
The sync state is ended with a call to the endSync() method:
public void endSync() throws EsaException, RemoteException {
The Sample ESA constructor does a one-time initialization which only sets up the logging. A single instance can be used to run multiple synchronization cycles, so most of the initialization should probably be done by the startSync() method.
The ESA parameter values should not be queried in the constructor. The sync core callback interface has not yet been set. Also, it is possible that the ESA parameter is not yet managed because getParametersMeta was not called. Therefore, the parameter value query should only be done in the sync state.
Metadata
The ESA returns information about external structures/tables, fields in each table, and relations between them, using the following code:
public Set<ExternalStructure>getStructureList(Locale locale)
...

public Set<ExternalField>getFieldList(String
structureOrCollection, Locale locale)

...


public Set<ExternalRelation>getRelations(String
structureOrCollection, Locale locale)
Note: the term structure is used to highlight the fact that, physically, this could be almost anything: a database table, a file, an object-oriented database, and so on.
ExternalStructure.name, returned from getSructureList, is a logical structure name. It is later passed to getFieldList, getRelations, and other calls. Similarly, ExternalField.name and ExternalRelation.id are local fields and relation names which are used in the ExternalRecord structure and passed to CRUD methods.
Data Reads
The ESA is queried on external records using these methods:
public Set<ExternalRecord>getModified(final String structure, final Date after)
...

public ExternalRecord read(String structure, String pk)

...

public Set<String>getDeleted(String structure, Date since)
Please read the methods' Javadoc comments for implementation details.
The getDeleted method might be hard to implement: public Set<String>getDeleted(String structure, Date since). See the Javadoc comments for possible strategies.
Note: structure is a structure logical name, as returned from the getStructureList() method. In addition, if the after timestamp in getModified is null, this means 'return all records'. Usually it has a null value on the initial synchronization, or after a Reset Records Peering is executed.
Data Updates
External records are manipulated through these methods:
public ExternalRecord create(String structure,
ExternalRecord values)
...

public Date update(String structure, Date lastSeen,
ExternalRecord values)

...


public void delete(String structure, Date lastSeen,
String pk)
Please read the methods' Javadoc comments for implementation details.
Note: the lastSeen parameter is used to implement optimistic record locking. If this fails, throw OptimisticLockFailureException.
Exceptions
Exceptions are reported using a <result> tag with a nested <exception> element.
<exception type="general | record | configuration|alreadyconfigured
|optlockfailed | concurrentdelete">
<message>Exception message to be shown to user</message>
<trace>Exception message to be put to logs</trace>
</exception>
Exceptions of type optlockfailed and concurrentdelete should also have a nested tag:
<configured-to>External ID, to which ESA is configured to</configured-to>
Exceptions of type optlockfailed and concurrentdelete should also have nested tags:
<external-id>record ID</external-id>
<modified-at>record ID</modified-at>
These should contain exception stack trace or some other diagnostic information (FILE/LINE, etc) which would allow ESA developer to investigate the problem better.
- All 'legal' ESA exceptions are derived from the
EsaExceptionclass. - The generic
EsaExceptionis fatal and aborts the synchronization. EsaRecordException, in contrast, does not abort the whole synchronization and just marks a single record as failed.OptimisticLockFailureExceptionis used to implement optimistic locking for the time between when a record is read, usinggetModifiedorread, and the time it is updated. If it fails, the synchronization cycle will repeat.- All unexpected exceptions, other than
EsaException, abort the synchronization.
Locale
Some messages have a Locale argument, which is a locale and country code, as described in the ISO-639 and ISO-3166 - <language-code>- <country-code>- <variant>. Examples are "en_US", "ru_RU" and "pt_BR". If the ESA doesn't support the required locale or doesn't support localization at all, it should return an American English label and hint.